Winter is coming, and with it, most motorhome owners look to storing their vehicles for the cold months. This is a common practice, not just in the UK but all over the world, however, uncovering your motorhome in spring or summer to find it in a less-than-perfect condition can be a nightmare.
The correct storage preparations can make storing your motorhome for the winter a breeze. Cleaning the interior and exterior of your motorhome, checking fluid levels and tyre pressures, disconnecting the battery and covering the vehicle with a protective wrap are all steps you can take to ensure the best storage of your vehicle. If you leave your vehicle insured during its storage period it’s best to check over your policy documentation for a section on storage. Most motorhome insurance policies will have conditions regarding storage and these might influence how and where you store your motorhome.
Winterising your vehicle is an important process for the longevity of your holiday investment. To be clear, winterising in this instance is the process of getting the vehicle ready to be stored for the winter and isn’t to be confused with getting a motorhome ready to go on a skiing holiday.
Let’s look at some great steps you can take to have the best storage conditions possible for your motorhome.
1. Clean the Interior and Exterior of Your Motorhome
When it comes to storing anything, let alone your motorhome, one of the most important steps is to clean it thoroughly. Performing a deep interior and exterior cleaning will help get rid of any built-up dirt or grime, and it will also protect the vehicle from weathering. This will also allow you time to inspect the vehicle meaning you’ll notice any areas that need repairs from your previous holidaying adventures.
Getting on top of cleaning your vehicle at the beginning of this process will prevent any unexpected headaches later on. Be sure to pay special attention to areas that tend to accumulate dirt, such as the dashboard and door handles as you don’t want fungus growing anywhere inside your motorhome.
Interior Cleaning
You can clean the interior of your motorhome with a simple household cleaner from the supermarket, or you can buy a specific motorhome cleaner from your local store. If you prefer the latter of the two products, a unified consensus reveals that Autoglym’s Motorhome and Caravan Cleaner is a great starting place. Whichever product you use be sure to read the instructions carefully so that you don’t damage any part of your vehicle.
Ensure that you remove the soft furnishing from your motorhome, or at the very least position them so that they are well-ventilated. Washing all bedding, curtains and cushions will help get rid of any dirt or stains that have built up over the previous year and will leave your motorhome feeling fresh when you come to use it again.
Dealing With Dampness
When storing your motorhome it isn’t uncommon for dampness to form. This is because motorhomes are generally airtight environments, so any moisture that gets inside is likely to stay there until you open the door or windows to let some air in. This can create the perfect breeding ground for mould and mildew, which you want to avoid.
The solution to this problem is to try and keep the motorhome as ventilated as possible. You can do this by opening all of the windows and doors during your cleaning and preparation for storage but this isn’t advisable when storing the vehicle. Openings allow for insects or vermin to enter the motorhome, which is why you should only do this during the cleaning process or whilst the van is in use.
If you know that the motorhome is damp internally you could use something like an electric dehumidifier to help dry the air out. This will also help to stop any condensation from forming on the windows. If this isn’t an option then purchasing some moisture absorbers is your next best bet and dotting them throughout the vehicle.
Exterior cleaning
For the exterior, you should start by using a garden hose to rinse off any dirt or mud. If you’ve bought Autoglym’s cleaner mentioned above you can use that on the exterior too, saving you money in the long run. However, if you don’t have an interior and exterior cleaner a general car washing liquid will work just fine. Make sure you reach all over your motorhome when cleaning the exterior, this includes the hard-to-reach roof for which you may need a telescopic brush.
After cleaning and drying the vehicle you may also want to use car wax to protect the paint job from the elements as well as getting it ready to roll straight out of storage for use in the Spring and Summer months. Be sure to follow the instructions closely, and avoid getting wax on any windows or other surfaces that shouldn’t be waxed.
2. Check Your Motorhome’s Fluid Levels and Tyre Pressure
Before putting your caravan into storage it’s important to check the fluid levels and tyre pressure of your motorhome. This helps to ensure that your vehicle will be in good working order when you come to take it out of storage, and it also helps to prevent any issues while your motorhome is stored away.
To check the fluid levels in your motorhome, start by checking the engine oil. You can do this by opening the bonnet and locating the dipstick. Once you’ve found it, wipe it clean with a cloth and then reinsert it into the engine. After a few seconds, remove the dipstick again and check to see where the oil level is. If it’s below the minimum line then you’ll need to top it up before storing your motorhome.
Next, you should check the coolant levels. This is important as low coolant levels can cause your engine to overheat whilst driving. To check the coolant levels, find the coolant reservoir and remove the cap. Once you’ve done this, check to see where the coolant level is in relation to the minimum and maximum lines. If it’s low then you’ll need to top it up. Doing this before putting your motorhome into storage will help to prevent any issues when you come to take it out.
The final fluid level to check is the brake fluid. This is important as low brake fluid levels can cause your brakes to fail whilst driving. To check the brake fluid, locate the reservoir and remove the cap. Once you’ve done this, check to see where the brake fluid level is in relation to the minimum and maximum lines. If it’s low then you’ll need to top it up.
As well as checking the fluid levels, you should also check the tyre pressure of your motorhome. This is important as incorrect tyre pressure can cause problems whilst driving, such as decreased fuel efficiency and increased wear on the tyres. You can check the tyre pressure by using a tyre pressure gauge, which you can buy from most vehicle accessory stores or petrol stations. Once you’ve checked the tyre pressure, inflate or deflate the tyres as necessary to get them to the correct pressure. Performing this before putting your vehicle in storage will help to prevent any issues when you come to take it out.
Of course, if you’re unsure about any of the above refer to your owner’s manual or you can take your motorhome to a professional to have it serviced.
3. Drain Your Motorhome’s Water System
Any water left in your motorhome’s water system is at risk of freezing and causing damage. To avoid this, you should drain the water system before putting your motorhome into storage.
To do this, start by turning off the water supply to your motorhome. Once you’ve turned it off, open all of the taps and flush the toilet until the water has stopped running. Next, turn on the water pump and let it run until it’s empty. Once the pump has stopped, turn off the power.
With the water system turned off, you should now leave all of the taps open and flush the toilet again to empty any remaining water from the system. Leaving the taps open ensures that they don’t seize during the storage period.
4. Clean the Filters
Remove any filters that may hold water, such as the water filter and air conditioning filter. These filters can become full of water over time, which can cause them to freeze and break during the winter.
Once you’ve removed the filters, clean them according to the manufacturer’s instructions and then dry them completely before storing them away or replacing them in the vehicle.
5. Empty the Waste System
Ensuring that any dedicated flush systems are drained and emptied will help to prevent odours and the build-up of waste in your motorhome over the winter. You can also use a tank cleaning product to clean the system and help prevent anything from going wrong over the winter.
6. Gas System
If your motorhome has a dedicated gas system, then you should have this checked by a professional before putting it into storage. This is important as a gas leak could be extremely dangerous.
Once you’ve had the system checked, make sure that all of the appliances are turned off and that all valves are in the correct position. You should also disconnect any hoses to prevent accidental leaks, this might include gas cylinders. A good idea is to cover the end of the pipework that you disconnect with a cap or possibly some rag to prevent anything from climbing into it and causing a blockage.
You will need to check with the storage site whether or not you can leave the gas canisters in the motorhome during storage or if you need to remove them.
7. Electrical System
If you have any batteries in your motorhome, then you should check the level of charge before putting it into storage. This is important as batteries can discharge over time and may not work when you come to take the motorhome out.
Turn off all of the appliances in your motorhome and then disconnect any external power sources. If unused for a long period both the vehicle’s battery and the leisure batteries may need to be removed and stored in a cool, dry place.
To help prevent any issues with the electrical system, you should cover any exposed wires with electrical tape. This will help to prevent any accidental shorts which could cause damage.
8. Handbook Check for Prolonged Storage
Your motorhome’s handbook might have specific instructions on what needs to be done if you’re planning on storing it for a prolonged period. It’s important that you follow these instructions as they’ll be specific to your vehicle and will give you extra information too.
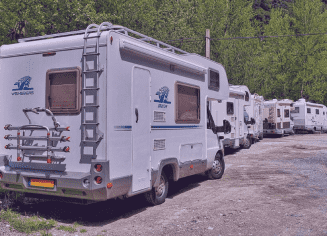
9. Choose a Storage Site
When it comes to choosing a storage site for your motorhome, you should consider a few different factors. The first is security, as you’ll want to make sure that your vehicle is safe and secure whilst it’s not in use.
You should also think about the location of the storage site and whether or not it’s easily accessible. If you’re planning on using your motorhome regularly, then you’ll want to be able to get to it easily.
Finally, you should think about the cost of storage. This is something that will vary depending on the location and the type of storage that you choose.
A great place to start looking for motorhome storage sites is through the Caravan Storage Site Owners Association. These sites, whilst may have a greater cost to them, will help to prevent any form of theft and reduce damage during your vehicle’s time stored.
10. Cover the Vehicle
Using a breathable cover for your vehicle will help to protect it against the elements and any dust or debris that could get into it. You should make sure that the cover is secure and doesn’t have any holes in it. If left in the open your vehicle might be prone to a build-up of algae on the roof, around the trims and the window seals.
Fitting your home with a cover will help to prevent this and mean that once you’re ready to use the vehicle again you won’t need to clean it. This does mean however that you should store the motorhome after it has had a good external wash to avoid any dirt from scratching the paintwork during the covering procedure.
If you’re not keen on using a cover, or if you can’t find a cover to fit your motorhome you might look at an alternative such as a protective wrap. These wraps are often brushed or sprayed on in a garage and will repel both water and other nasties such as algae. You can then clean this wrap off with a strong cleaner before using the motorhome again.
Final Storage Tips for Motorhomes
- If can, take the vehicle for a run once a month as long as you’re still insured.
- If you can wash the cover regularly with a hose or watering can you’ll make the cover last and prevent having to buy another one sooner.
- Chocking your vehicle wheels will remove any chance of the vehicle rolling during its storage, you can then pair this with leaving it in gear and releasing the handbrake to prevent seizure of the brakes.
- If your motorhome has it, turning on a battery-operated security system will be a good idea to help with the prevention of break-ins.